God of War (2018) - Entry 10: Thamur’s Corpse


While we traveled the waterways completing favors for wayward spirits and the dwarves, Mimir shared many stories about his service to the Aesir and the cruel nature of Odin and Thor—particularly in their treatment of the giants, which ultimately drove them to leave Midgard. Odin was obsessed with finding a way to Jötunheim, convinced the giants held the key to controlling his fate at Ragnarök, the prophesied end of the world and death of many gods, including Odin and Thor. Mimir also told us how he came to serve Odin, though his role eventually became trying to contain Odin’s cruelty...until Odin saw this as betrayal and trapped him in the tree.
During our travels, we also came upon wooden triptychs built by the giants. These depicted stories of legendary Jötnar and their prophecies—Jötnar Shrines. Mimir elaborated on the tales surrounding each of the depicted giants, all of which seemed to end the same way: death at the hands of Thor.
His tales reinforced what I’ve told Atreus all along: there are no good gods.
On a lighter note, he also shared the story of how he got his Bifröst eyes—a gift from the Giants for being a trusted supporter.
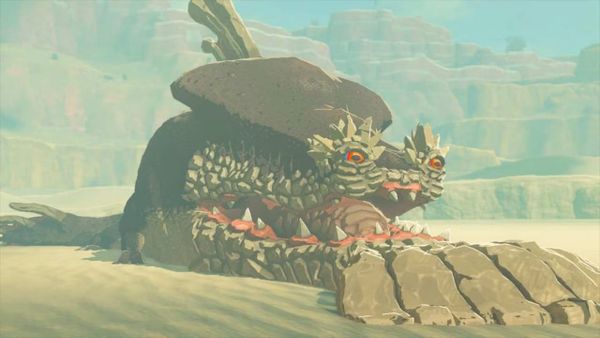
Upon completing the favors, we return to the Lake of Nine and set out toward the Mason's Channel to obtain the magic chisel that can carve the travel rune to Jotunheim. However, before continuing, we dock at a nearby beach to explore the area. As we open a door, we come upon another imprisoned dragon.
Mimir identifies it as Fafnir. Atreus, confused, recalls that Fafnir was a dwarf. Mimir confirms this but explains that his transformation into a dragon was likely a consequence of his greed. Despite Fafnir’s past, both Mimir and Atreus agree that no creature deserves imprisonment, so we decide to free him.
Just like with Otr, we seek out the binding shrines scattered throughout the area, fighting off numerous enemies as we go. Once all three shrines are destroyed, we return to the anchor, and Atreus uses Faye's knife to dispel the magic seal and break Fafnir’s bonds—freeing him.
As the dragon takes flight, Mimir dryly observes that being a dragon has done nothing to improve Fafnir’s personality. While exploring the area, we also discover a lore marker suggesting that Fafnir’s transformation was caused by a Vanir mirror.
We return to our boat and continue down the Mason's Channel, making our way back to the beach where a spirit attacked us. When we open the channel gate we are ambushed by an ogre and a group of dark elves seeking revenge. After a hard-fought battle, we return to the boat and continue down the channel, heading toward a region blanketed in snow and ice.
As we travel, Mimir recounts the tragic tale of Thamur, a famous frost giant stonemason who was slain by Thor. In his death, Thamur's gargantuan corpse collapsed onto a Vanir village, destroying it. The village had been home to the Vanir god Njord, though Mimir doesn’t elaborate on his fate.
Eventually, we reach the end of the channel and come upon Thamur’s colossal remains. Mimir explains that because Thamur was a frost giant, his final breath transformed the surrounding area into a frozen wasteland.
Upon disembarking, we encounter a new enemy—Wulvers, vicious wolf-like creatures that fight with terrifying speed and ferocity. After defeating them, we navigate around the giant’s corpse and the remnants of the village, searching for the magic chisel.
Soon, we come upon Thamur’s massive head, with the chisel embedded deep in his skull. However, the tip of the chisel is buried beneath an incredibly thick layer of ice. Mimir remarks that even Thor himself wouldn’t be able to break through it.
Noticing Thamur’s massive hammer lying nearby, an idea begins to form. I remark that "Thor must be a fool", though I keep my plan to myself for now.
Before we can discuss further, we are ambushed by an onslaught of Draugr and Ogres. Working together, we fight them off until the area is finally clear.
Just as we catch our breath, we hear Sindri calling out from a ledge nearby. He drops a chain for us to climb up to his shop. Confused by how he managed to stay hidden, I question the dwarf. Sindri explains that he can exist between the realms, making himself invisible to most—though, as he notes, not to dragons, apparently.
As we press on, Atreus, intrigued, begins theorizing about my plan and asks a series of questions. We enter the ruins of a nearby temple, where we battle and defeat a Traveler. Afterward, Mimir shares with Atreus that he has been to this temple before—once as a mediator, attempting to broker peace between the Aesir and Vanir.
Continuing through the ruins, we finally arrive at the base of Thamur’s hammer, frozen solid in the ice. Atreus helps me use a Shatter Crystal to blast the strap, breaking away the frozen bindings. The hammer begins to fall—but a strap higher up catches it, stopping its descent.
Mimir, realizing my intentions, dryly remarks that this is not a particularly stealthy plan. As we climb up the hammer, Atreus continues to ask questions—until, at last, the pieces click together, and he fully understands what I have in mind.
Reaching the top of the hammer, I pull off the strap buckle, and the hammer begins to fall. As it plummets, Atreus and I leap onto a nearby ledge, with Mimir dryly noting that this plan seems ill-advised. However, before the hammer can complete its descent, its mallet gets lodged against a rock wall above, stopping it short.
We enter a temple door on the ledge and find ourselves in a large chamber with a collapsed floor and a sand bowl at its center. Solving a riddle reveals a rune word that appears before the bowl. When Atreus writes it into the sand, the floor magically reconstructs and begins to rise—but only as long as he continues writing the rune word.
Curious, I ask Mimir how this is possible. He explains that it is likely a form of temporal magic once favored by the Vanir god Njord.
Before we can ascend safely, Draugr suddenly leap onto the platform, attacking Atreus and preventing him from writing. With the floor beginning to destabilize, we fight quickly to clear the enemies, buying Atreus enough time to maintain the spell. The battle continues as we rise higher, until, at last, we reach the top and jump off the platform just before the magic fades and the floor collapses behind us.
As we step out onto the top of the temple, we see Thamur’s hammer still wedged against the rock. Walking over to where it leans, I tell Atreus to push with all his might. Together, we heave against the hammer, forcing it away from the wall. As it begins to fall, we jump onto it, riding it down as it smashes through the ice, sending us plummeting into the caverns below.
We crawl out from beneath the debris, shaking off the impact, only to see more of the cavern collapsing around us. The chisel lies just a short distance away, finally within reach. Mimir, ever the observer, dryly remarks that I seem to have quite the talent for destroying things.