Zelda: Breath of the Wild - Entry 15: The Great Skeletons

Upon arriving at the stable, I find three researchers deep in discussion about the extinction of the Leviathans. They’re debating theories and searching for evidence to support their claims. Recognizing me as an experienced traveler, they ask if I’ve ever come across any Leviathan Great Skeletons and offer to pay handsomely for any photos or drawings I can provide.
Luckily, I’ve already encountered two such skeletons—one in Eldin and another in the Gerudo Desert—so I assure them I can help. I leave the stable and head toward the Eldin skeleton, taking the opportunity to explore a bit along the way. After snapping a clear photo with my Sheikah Slate, I use my shrine travel ability to teleport to the Gerudo skeleton, capture another photo, and continue my journey toward Snowfield Stable to kick off my Hebra explorations and really put my new snow boots to the test.
When I arrive at Snowfield Stable, I’m immediately hit with that cozy feeling of being by a warm fire or tucked into a soft stable bed while the world outside is blanketed in snow and ice. One of the travelers there tells me about their fascination with the elusive Stalhorse, wishing they could see one in person. I pull up a photo from my slate, which both delights and unnerves them with its haunting image.
While exploring the area around the stable, I stumble upon Pondo’s Lodge and his famous snow bowling attraction. I decide to stay the night, enjoying a few rounds of snow bowling, laughing at my near-misses and lucky strikes. In the morning, I head back to the stable to restock supplies and prepare for a longer expedition deep into the cold, rugged expanses of the Hebra Mountains.
The next morning, I take Sparta to the northernmost part of the Tabantha Snowfield to explore. The harsh realities of Hebra quickly remind me of its dangers: bitter cold, relentless blizzards, roaming Lynels, aggressive wolves, and monster camps scattered across the icy expanse. Despite the challenges, I press on and eventually reach the North Lomei Labyrinth, an enormous maze carved into the snow-covered landscape. Navigating its winding corridors, I solve its mysteries and uncover a hidden shrine.
Continuing my journey, I venture north of the Hebra Mountains, battling through monster camps and defeating a formidable Stalnox along the way. Eventually, I discover another shrine tucked away in the Icefall Foothills. At this point, the rugged terrain becomes too treacherous for Sparta, so I send her back to the stable. Using nearby updrafts, I paraglide toward the North Hebra Summit.
High in the mountains, I stumble upon a hot spring—a welcome refuge from the bone-chilling winds and non-stop blizzards. I soak in the warmth, allowing my weary body to recover. By morning, the skies clear, and I’m rewarded with a breathtaking view of Hebra, stretching southward in a vast, snowy expanse. It’s easy to see why adventurers risk these perils just for the thrill of shield surfing down the steep slopes toward Lake Kilsie.
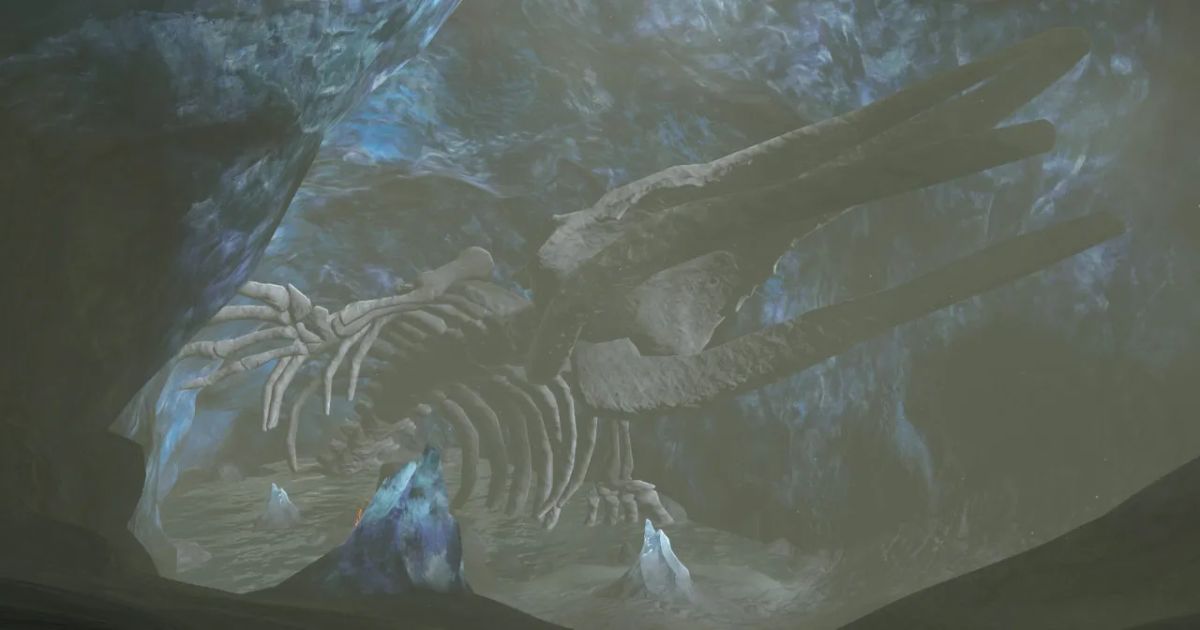
Pushing east, I remain in the northern highlands and come across a giant stone door embedded in the mountainside. Despite my efforts, I can’t budge it. But then I notice its position—right at the bottom of a steep hill—and an idea sparks. Determined, I climb the hill, pack snow into an enormous snowball—almost too large to move—and carefully line it up with the door. With a mighty push, the snowball barrels down the slope, growing even larger as it gathers more snow. It crashes into the stone door with tremendous force, revealing an entrance carved into the mountain.
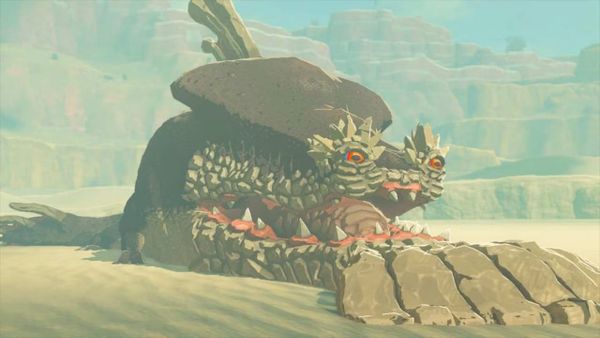
I paraglide down to the newly opened passage and am met with an awe-inspiring sight: a massive Leviathan skeleton resting within the cavern, its ancient bones frozen in time. Beside it stands a shrine. I snap a picture of the skeleton for the researchers at Serenne Stable before stepping into the shrine to claim the monk’s blessing.
I spend the night in the giant mountain cave, grateful for the respite from the relentless wind and cold. Rested, I set out the next morning, making my way back toward Snowfield Stable. Along the way, I discover another hot spring, a welcome surprise that offers a brief moment of warmth before I continue my journey. Eventually, I arrive at Selmie's Spot/Lodge, where I spend the day enjoying some shield surfing, taking full advantage of the steep, snow-covered slopes.
Refreshed, I travel through the beautifully unique Pikida Stonegrove, where towering, mushroom-shaped rock formations rise from the snow like ancient sentinels. The landscape is breathtaking, but danger lurks even in beauty—I encounter and defeat a formidable Frost Talus before continuing south.
Eventually, I stumble upon another giant stone door embedded in the mountainside at the bottom of Kopeeki Drifts. Remembering my previous success, I employ the same snowball trick: rolling a massive snowball down the slope to smash open the door. As expected, it works perfectly, revealing yet another hidden shrine nestled within the mountain.
Climbing back up the mountain out of the drifts, I catch a glimpse of an orange glow to the west—a sliver of light from another shrine. Tempting as it is, exhaustion from the recent journey weighs heavily on me. I decide to head back to Snowfield Stable to rest and recover before pushing any further.
After a good night's sleep and a day of recovery, I set out to investigate the shrine I spotted. When I reach the area, I find the shrine tucked beneath a stone canopy, surrounded by the fast-moving, frigid waters of the Hebra River. I circle the rock enclosure, searching for an entry point that won’t involve plunging into the freezing water, which would surely spell my doom. The only option is a narrow ledge where I can cling to the rock face, edging sideways just above the rushing current.
With careful maneuvering, I manage to create a Cryonis pillar inside the canopy, giving me a platform to drop onto before my grip fails from the steep, awkward angle. Once safely inside, I use more Cryonis pillars to cross the remaining distance to the shrine. After receiving the monk’s blessing, I find a log near the shrine and use it to float down the river and out of the canopy.
Realizing my proximity to Rito Stable, I make my way there to regroup. From the stable, I plan to take a horse west of Passer Hill and head north toward Lake Kilsie and the rugged peaks of the West Hebra Mountains.
On my way to Lake Kilsie, I discovered a dragon skeleton and encountered several monster camps that I had to clear. I stayed along the mountain ridge above the lake until I spotted some docks illuminated by torches, where I paraglided down to land. As I reached the docks, I noticed a crack in the mountain with the distinctive orange glow of a shrine shining through from the other side. However, there was no clear path to reach it.
To the left of the cracked wall, I spotted some loose rocks. After clearing them with a bomb, an updraft was revealed. Using the updraft, I ascended and noticed more loose rocks on the opposite side of the lake. Blasting them uncovered another updraft. I repeated this process about two more times until I finally spotted a torch-lit cave entrance in the mountainside on the northwest side of the lake. Upon entering the cave and following—sometimes swimming along—a stream within, I eventually reached the shrine.
After receiving the shrine’s blessing, I continued exploring the mountains surrounding the lake. Along the way, I discovered another hot spring and defeated a Hinox before heading back to Rito Village to rest. Feeling satisfied with my exploration of Hebra—made easier thanks to my snow boots—I decided to return to Serenne Stable to show the researchers the photos I had taken of the leviathan bones while contemplating my next adventure.
During the long ride from Rito Village to Serenne Stable, I find myself reflecting on all the places I’ve traveled. This leads me to think about the places I haven’t yet explored—the Lost Woods, Zora’s Domain, and the area around Hyrule Castle. The Lost Woods still gives me the creeps just thinking about it, so I shift my focus to Zora’s Domain and the region surrounding Hyrule Castle.
I had initially avoided Zora’s Domain because of their search for a Hylian warrior. But as I continue to embrace my role as a special warrior, growing stronger with each spirit orb I obtain, I now feel compelled to answer that call. Perhaps I’ll even meet a Zora priest who can officiate Hudson and Rhondson’s wedding.
I arrive at Serenne Stable in the evening, finding the researchers gathered around a fire outside. I show them the photos of the great skeletons before turning in for the night. In the morning, I’ll set out for Zora’s Domain.